Cut/Trim/Split WMA File – 2 Popular Ways

If you are a dance teacher, you may probably need to cut your own WMA music for your classes. If you have added a WMA audio to a PowerPoint slide, you may need to trim away unwanted content at the beginning and/or end of the clip. But it often happens that there is no WMA cutter at hand or it is too complicated. No worries. This article is going to teach you how to split WMA file while preserving the original sound quality as much as possible. Two fast and easy ways will be shown below.

Part 1. Cut WMA Offline Losslessly

Part 2. Cut WMA Online

Part 1. How to Split a WMA File – Joyoshare VidiKit

In order to cut WMA audio files without causing any quality loss, here Joyoshare VidiKit (originally Joyoshare Media Cutter) is highly recommended. It is compatible with a majority of audio and video formats, including WMA, MP3, FLAC, ALAC, MP4, MKV, AVI, OGG, WAV, AIFF, M4R, AU, M4B, CAF, and more. Using this tool, you will be able to cut any selected part of your WMA file easily and accurately at 60X ultra-fast cutting speed.

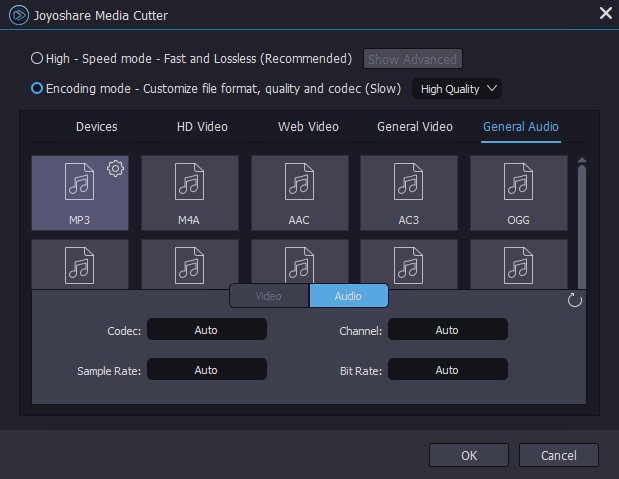
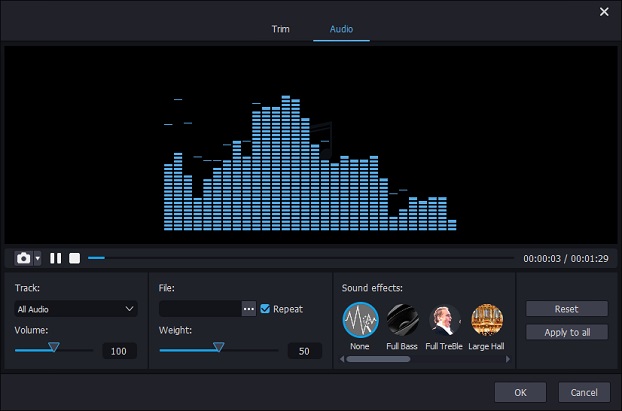
When enabling the encoding mode of the program, you will be able to touch up your videos and audios using the built-in video editing tools of the program. You can change the audio codec, channel, sample rate, and bitrate of your WMA file. Some special sound effects are available as well. Succinctly, this all-powerful toolkit will allow you to split WMA perfectly in no time flat.

Key features of Joyoshare VidiKit

  • Trim WMA files to the exact length you want
  • Split a big WMA audio file into several small-sized files
  • cut off unwanted parts of WMA files losslessly
  • Support 60X fastest speed and over 150 formats
  • Offer multiple editing features to customize videos and audios

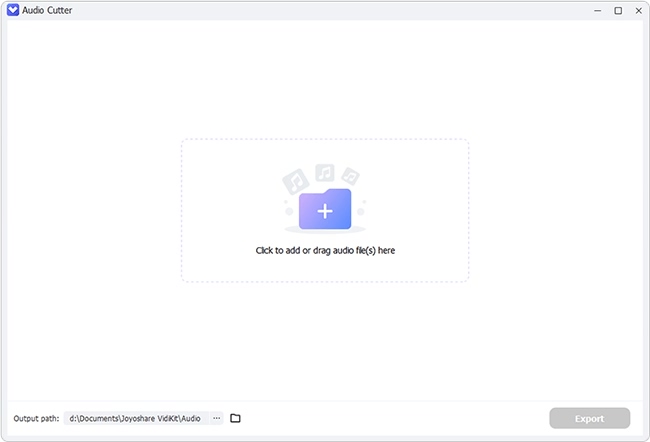
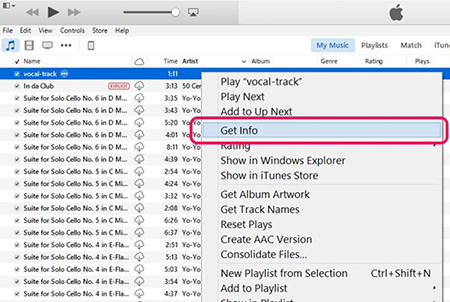
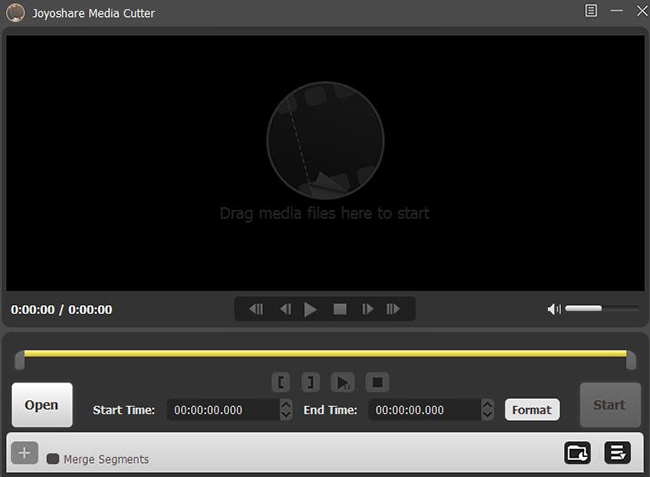
Step 1: Add WMA to Joyoshare VidiKit

After a successful installation, you can launch Joyoshare VidiKit on your computer and then select the “Convert” panel to open the video audio cutter. Click on the “Open” button to browse and add your WMA file to the program. You can also directly drag and drop the WMA file you want to cut into the program window.

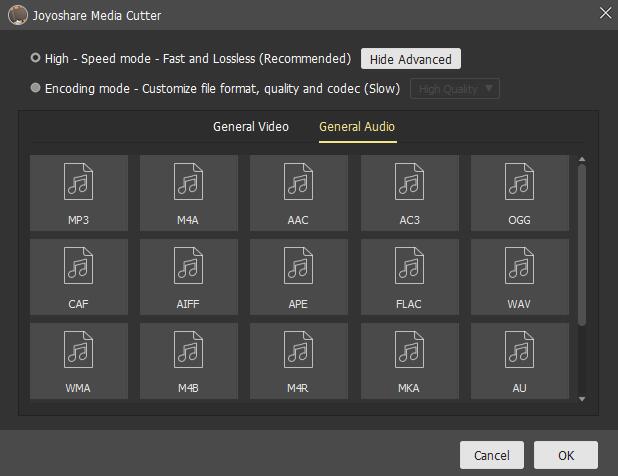
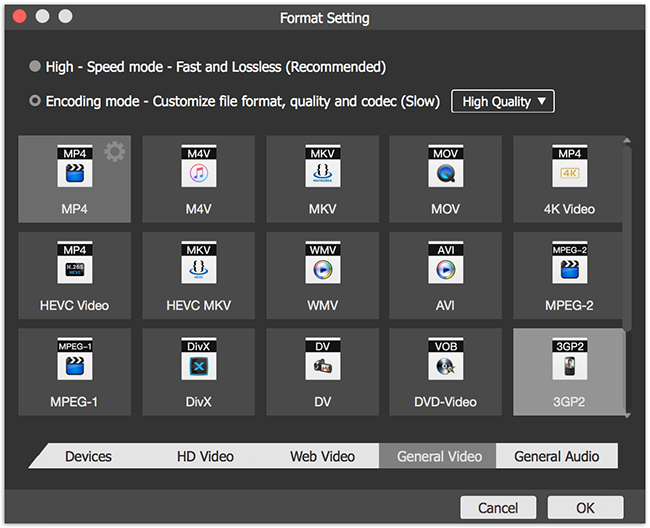
Step 2: Select Mode and Output Format

Next, press the “Format” button. If you want to cut WMA without quality loss, you are highly recommended to select the high-speed mode. But if you prefer to edit your WMA file and save the changes, then you are suggested to use the encoding mode, which is going to save all the changes you are about to make. If you would like to adjust audio parameters, you can click on the gear icon near the WMA audio format icon under the encoding mode.

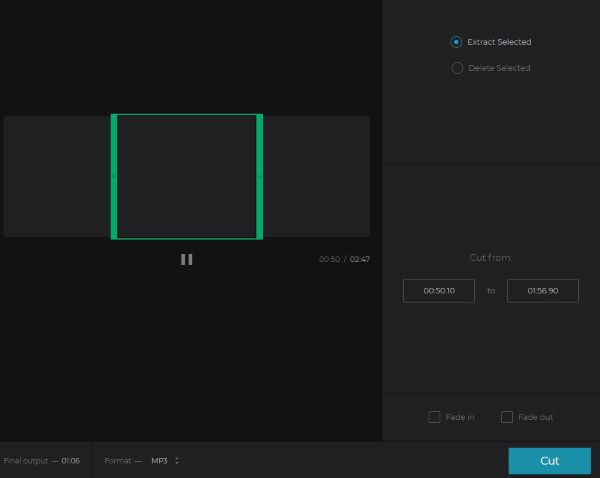
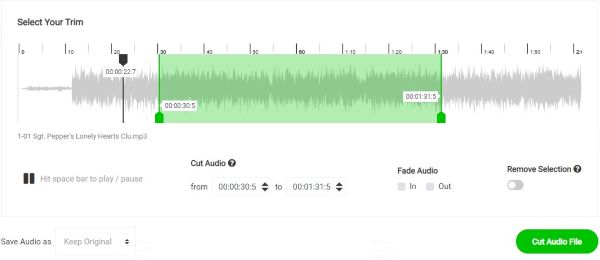
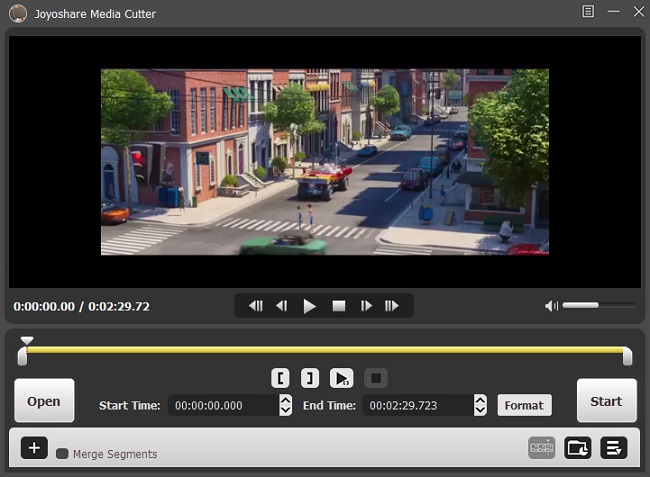
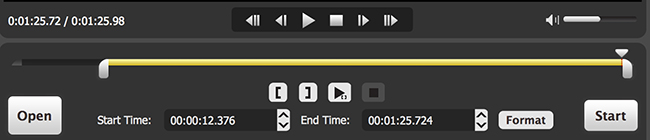
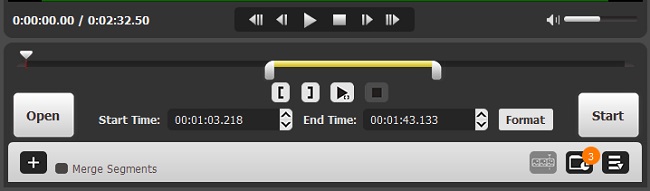
Step 3: Trim WMA Audio File

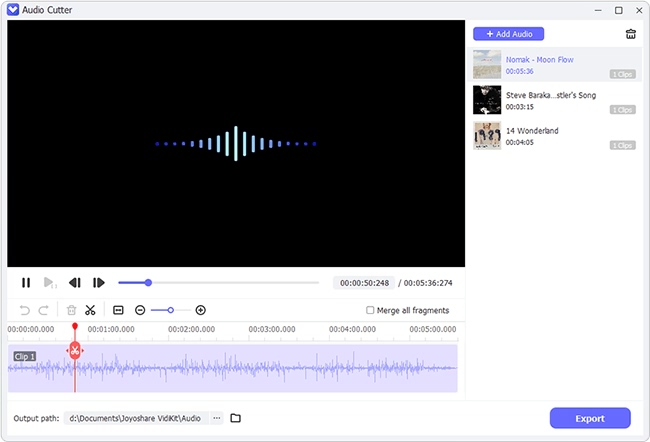
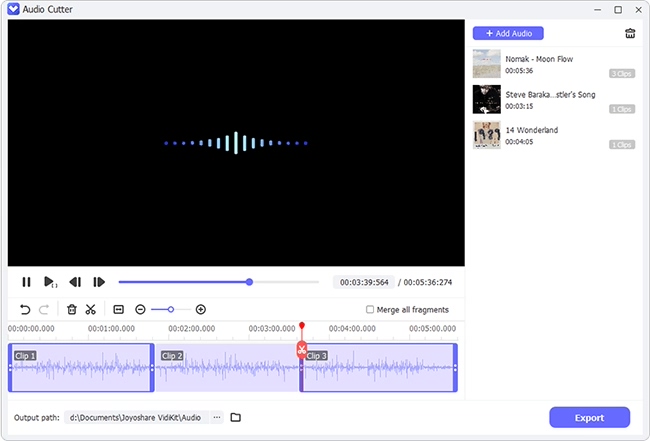
Now you can go back to the main window of the video audio cutter. Here you are able to cut a WMA audio file in different ways. For instance, you are free to drag the trim markers on the slider. The “Set Segment Start Time” and the “Set Segment End Time” buttons are useful as well. Another way to split WMA is to use the temporal interval near the “Open” button. Press the “+” icon to add a new audio track.

Step 4: Export and Save WMA

When you are ready, you can tap the “Start” button to let Joyoshare VidiKit split WMA file for you. After a short while, you can click on the “Open The Output Folder” button to check your edited WMA audio file.

Part 2. How to Cut a WMA Audio File Online – AConvert

Using an online WMA cutter such as AConvert is a perfect solution for people who prefer not to download and install any extra third-party programs on their computer. AConvert supports many popular audio formats, such as WAV, WMA, MP3, FLAC, AU, OPUS, RA, MKA, M4A, and so forth. You can upload your favorite WMA files from your computer, Google Drive, Dropbox, or through URL. It allows you to set WMA audio start position and duration freely. Be aware that the WMA audio file size should be no more than 200M.

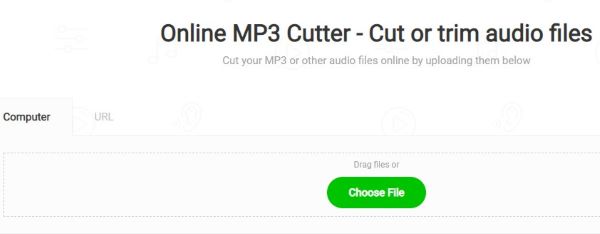
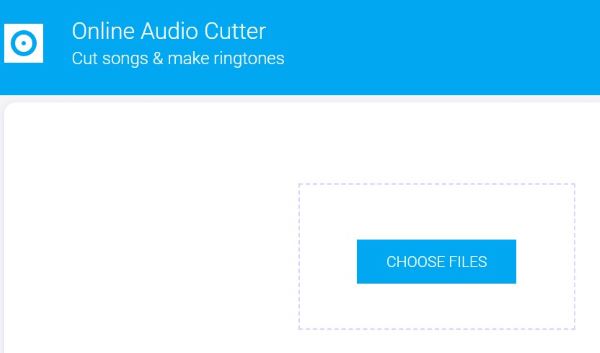
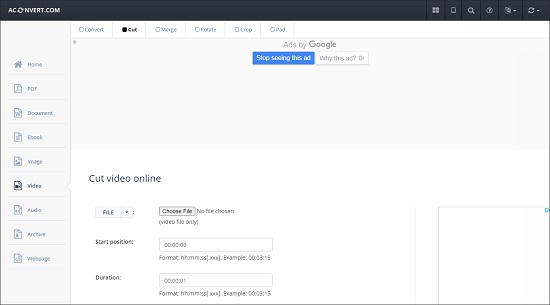
Step 1: Open AConvert online WMA cutter and press the “Choose File” button to import the WMA file you would like to cut; you can expand the “File” dropdown list to select the source;

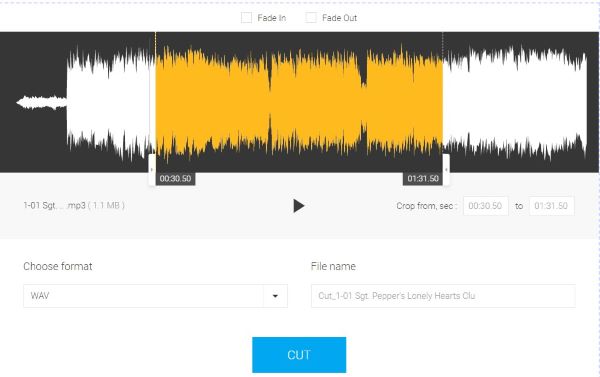
Step 2: Set the “Start position” and “Duration” according to your actual needs;

Step 3: Click on the blue “Submit” button below and AConvert will start to trim your WMA file.

Top 5 Free Ways to Cut MP3 to WAV Online

You may know about MP3 and WAV more or less. As a matter of fact, MP3 is a universally used audio format, which uses lossy compression and can be played almost everywhere. It occupies less storage space. However, WAV files contain uncompressed audio, but takes up quite a bit of space. An amazing thing is that now you can cut MP3 to WAV to enjoy higher sound quality while cutting out some unnecessary parts of your music file at the same time. Listed below are the best 5 free online audio cutters. Besides, we will also introduce you a handy and lightweight video cutter to help you losslessly trim, cut, split and convert videos and audios with ease.

  • Part 1. 5 best free online tools to split MP3 to WAV
  • Part 2. The best tool to cut MP3 to WAV offline: Joyoshare Media Cutter
  • Part 3. More about MP3 and WAV

Part 1. 5 best free online tools to split MP3 to WAV

#1 MP3 Cutter Online & Free — Crop MP3 Easily — Clideo

click here to cut

This tool is easy to use, but its function is limited. You can do nothing in the exception of cutting files and changing the format of files.

crop mp3 easily

Steps to cut MP3 to WAV:

Step 1: Open the website above;

Step 2: Click the Choose file button;

Step 3: Choose the range of your audios (drag the sound track or input the begin & end time);

Step 4: Choose the output format and click the Cut buttonStep 5: Download the edited file.

the detail to crop mp3

Pros:

User-friendly surface

The speed to download the file is fast

Easy to use

Multiple output formats

Cons:

The speed to recognize the file is slow

Limited functions

The cutting is slow

#2 Online MP3 Cutter – cut audio files in your browser

click here to cut

This tool has more functions than that of the first one, including recording audios.

Steps to crop MP3 to WAV:

Step 1: Open the website above;

Step 2: Pick the file you want to trim (Click the Open button or Drag and drop files to the green area);

Step 3: Click the Cut button;

Step 4: Click the Save button and Choose the output format;

Step 5: Click the Save button again to download your files.

cut audio files

Pros:

Support to open files from URL

Record audios

Can resturn the previous step

The speed to download the edited file is fast

Cons:

Limited output formats (5)

#3 Mp3 Cutter | Wav Cutter – Free Online Editor

click here to cut

The tool aims to cropping audios and has no other functions, supporting only 3 formats.

Steps to crop MP3 to WAV:

Step 1: Open the website above;

Step 2: Upload your audio file by clicking on ‘Drag your files here or click in this area’ below;

Step 3: Enter start and end time manually or play the audio files then click on buttons;

Step 4: Save your split file as mp3, wma or wav format;

Step 5: Give a filename as you wish or leave it as it is;

Step 6: Click on ‘Cut it’;

Step 7: Click on ‘Download Now!’.

mp3 and wav trimmer

Pros:

Set the Begin & End time in seconds

Cons:

The speed to download the edited file is slow

Not show the audio track

Support only 3 formats

#4 Online MP3 Cutter – Cut or Trim Audio Files for Free

click here to cut

This tool to crop audios not only supports uploading files from the computer, but also from URL.

cut or trim audios

Steps to split MP3 to WAV:

Step 1: Open the website above;

Step 2: Click the Choose File button or drag the file;

Step 3: Enter start and end time manually or drag the audio track;

Step 4: Click Save Audio as the format you need;

Step 5: Click Cut Audio File;

Step 6: Click Download Your File Here.

cut or trim audio files

Pros:

Support to trim the file from URL

The cropping is quick

Set the Start & End time for accuracy

Cons:

The speed to export is slow

Limited formats (5)

#5 Free Online Audio Cutter & Converter

click here to cut

If you want to change your file’s name when splitting, you can choose this tool.

audio cutter

Steps to cut MP3 to WAV:

Step 1: Open the website above;

Step 2: Click Choose Files;

Step 3: Enter start and end time manually or drag the audio track;

Step 4: Choose the format you need and you can change your file name;

Step 5: Click Cut;

Step 6: Click Download to save your file.

audio file cutter

Pros:

The speed to download files is quick

Support to change the file name

Easy to use

Cons:

Support 7 audio file types

The speed to upload files is slow

Note: Compared to other tools to download, these online tools above are more convenient. However, they still have terrible features-unsafe data when trimming. The audio files are to be saved in Cloud service and maybe someone else can also search them. Some audio cutter software can be used after downloading, but this can ensure your data’ s security. On the other hand, the exporting speed of the online free tools above is relatively slow. Therefore, downloading a cropping tool is a nice option. It takes up just a little space and promise a fast speed to split MP3 to MAV with high security.

Part 2. The best tool to cut MP3 to WAV offline: Joyoshare Media Cutter

Joyoshare Media Cutter is a professional cutter software to deal with both audios and videos, supporting multiple formats, such as AVI, MP4, MPEG, MP3, WAV, WMA, M4R, etc. Different with the online tools that only have simple cutting function, Joyoshare Media Cutter is far more than trimming MP3 to WAV, but also splitting WAV to MP3 or any other audio file formats. It supports more formats than all the above online MP3 cutters. Most important of all, you have 5 opportunities to cut audios in trail version. Except the cutting function, Joyoshare Media Cutter is a smart MP3 editor and offers many effects to be added to your audios.

Key Features:

Merge segments

Trim videos/audios without quality loss

The speed to export audios is fast (60X high speed)

Be easy to operate

Set Start Time and End Time for accuracy

Split WAV to MP3 or any other audio file formats

Step 1: Add Video/Audio Files to Joyoshare Media Cutter.

You have two options to add files:

Click the Open button

Drag and drop the files directly to the screen

open audios on cutter

Step 2: Choose the output format.

There are two types of main modes (each has multiple formats):

High-Speed mode (Fast and lossless)

Encoding mode (customize file formats and choose the quality you need)

choose audio formats on cutter

Step 3: Choose the segments you want to save.

You can set Start Time and End Time to crop for accuracy.

choose the segements you want to save

Step 4: Edit audio files, such as adding some effects.

edit audios

Step 5: Click the Start button to export the audio with high speed.

export audios

The tools I have recommended above all can help you split MP3 to WAV. But the last one is full of high security and more functions. You can not only edit audios, including cropping the original audio format to another format, but also edit video files. Most importantly, it supports more than 20 formats. But the online tools can handle limited file formats.

Part 3. More about MP3 and WAV

At present, the MP3 and WAV formats are the two most popular audio types. We know the formats when listening to music. But many people are confused about what the MP3 or WAV formats are and the differences between them.

  • Small size and save space
  • Acceptable fidelity
  • Lossless and uncompressed data
  • Use for professional work, such as broadcast

#1 Description of the MP3 format

MP3 or MPEG Layer 3 is a digital audio format created by the Moving Picture Experts Group. At that time, people hoped to replicate CD-quality at a less size. In the process, it caused loss compression, which means reducing the accuracy of certain components of sound.Pros: Cons:The partial discarding of data

#2 Description of the WAV format

Waveform Audio File Format (WAVE, or WAV) is another common audio file format, which is developed by Microsoft and IBM. The format is uncompressed and retains all of the samples of an audio track, so professional users or audio experts may use it for maximum audio quality.Pros: Cons:Large size and occupying more space

For more information, please visit the source page: https://www.joyoshare.com/video-cutting/cut-mp3-to-wav.html

How to Cut Audio from a YouTube Video with Ease

Sometimes after watching a wonderful cover music video on YouTube, you may think about saving a part of the audio track for personal use, such as use it as the background music of your new vlog or your presentations. Knowing how to cut audio from a YouTube video directly online and offline will release you from endless troubles. If you are looking for tutorials, then you’ve come to the right place. The following content will focus on how to do that easily and effectively using two handy and lightweight YouTube cutters.

Part 1. Joyoshare Media Cutter

Part 2. HashCut

Part 1. How to Cut Audio from YouTube Video – Joyoshare Media Cutter

Joyoshare Media Cutter for Windows and Mac is recognized as one of the most powerful video and audio cutting tools. Professional as it is, it is very easy-to-use. With its beautiful and beginner-friendly user interface, you will be able to trim, cut, and split your large files without damaging any quality at 60X faster speed than any other competitors. It supports various formats, including MP3, MP4, FLAC, OGG, WMA, MKV, FLV, MOV, and more.

This desktop program also offers additional features to you so that you can edit and customize your videos and audios, such as by inserting an image watermark, adding subtitles, applying special effects, cropping and rotating video, etc. Joyoshare Media Cutter provides you four available ways in total to cut the audio from your YouTube video precisely and accurately. You can rest assured that you will get a perfect audio clip easily and quickly.

Key features:

Extract and cut audio from a video

Extra advanced features to personalize videos

Support over 150 audio and video formats

Merge multiple clips from the same source into one file

Cut videos and audios losslessly at 60X super-fast speed

Step 1: Add a YouTube Video to the Program

After downloading Joyoshare Media Cutter, you are able to install and launch it on your computer. After that, press the “Open” button below the time handle to browse and add your YouTube video to the program, or alternatively, drag and drop it to the load area directly.

Step 2: Select a Mode to Cut and the Output Format

Once your YouTube video has been detected successfully by the program, you can press the “Format” button on the right side of the screen to choose a specific cutting mode and your wanted output format. The high-speed mode enables you to cut videos and audios losslessly, and the encoding mode will allow you to customize your files and help you save the changes you make.

Step 3: Begin to Cut Audio from YouTube Video

You are able to set the start/end time, drag the trim markers or use “Set Segment Start Time/Set Segment End Time” to define your cutting segment. A number of editing features are available as well by pressing the “Edit” icon. And finally, you are capable of pressing the “Start” button to export your YouTube audio easily and quickly.

Part 2. Cut Audio from YouTube Video Online – YouTube Cutter

Many online YouTube cutters allow you to cut a YouTube video and then export as an audio file. Most importantly, they support URL, which release you from downloading a YouTube video before cutting its audio. The YouTube Cutter we are going to introduce is one of them. It will bring you great convenience to cut audio from your favorite YouTube video.

Step 1: Open the online YouTube cutter and paste the URL of your wanted YouTube video into the box, and then press the “Start Cutter” button to move to the next step;

Step 2: Utilize the trim markers to set a duration by using the “Start time” and “End time” button, or alternatively, you can directly enter the specific time into the temporal interval;

Step 3: Choose an audio format from the dropdown list of “Filetype” and finally press the “Cut Video” to output your audio.

Cut or Trim OGG File Online/Offline Perfectly

OGG is a container format, which is designed for efficient streaming and manipulating high-quality digital multimedia and developed as a replacement for some proprietary digital audio encoding formats. An OGG file has a smaller size and provides better sound quality than an MP3 file. You may sometimes need to cut or trim a large OGG file to small fragments or adjust its bitrate, codec, channel, etc. You can read on this article to find out several OGG cutter software for online and offline uses we recommend to you. All of them have outstanding performance and you can finish your work swiftly and perfectly.

  • Part 1. Best Way to Trim OGG File
  • Part 2. Online Ways to Trim OGG File

Part 1. How to Cut an OGG File with Joyoshare Media Cutter

To trim an OGG file on your Mac or Windows computer, you need to use an all-round audio cutter. Joyoshare Media Cutter is good at cutting an OGG file without quality loss. It also allows you to add several segments and cut them at the same time. With a simple interface, you can use it immediately even though you are a beginner.

Beyond that, you can use the program to convert the OGG files to other audio formats, like MP3, AAC, M4A, CAF, WAV, MKA, AU, etc. It also comes with a built-in audio editor. With it, you can change track, add audio effect, adjust volume, and so on. What’s more, you can regard this program as an audio or video joiner since it can merge all clips into one, if you need it.

Amazing Features of Joyoshare OGG Cutter:

Can trim, edit audio with the built-in editor

Output OGG file quickly and stably

Trim MP3, OGG, and other audio files without losing quality

Support to customize codec, channel, sample rate, and bit rate

Step 1: Run OGG Cutter and Add File

Double click Joyoshare OGG cutter on the desktop to get the program running. You can drag the OGG file to the cutter directly. Or you can tap on the “Open” button to import the OGG file to the program. Notably, you can only add one same OGG file to the program at a time.

Step 2: Select Output Format

After loading the file, you can hit on the “Format” button next to the “Start” button. Then you will see a new tab. Please choose “High-Speed mode” and opt “Original” under the “General Audio” option and click “OK”. After that, you can obtain the target file rapidly and losslessly. There is another mode – “Encoding mode”. You can choose it if you need to change the parameters of the OGG.

Step 3: Confirm the Trimming Range

Now, return to the main interface to select the begin and the end point to cut the OGG. You can move the slider, enter the start and stop time, or click the “[ ]” button to choose a cutting region. Press the “Add Segment” option to import more segments.

Step 4: Start to Cut an OGG File

Move to the final step. If you need it, you can tick the box next to “Merge Segments” to join all clips into one. Hit on the “Start” button to begin outputting the trimmed OGG file.

Part 2. How to Cut an OGG File with Two Online Tools

There are many online OGG audio cutters. You can use them to cut OGG without downloading an offline audio cutter. Most of them are easy to use. Here are two popular online audio cutting tools introduced.

Online Audio Cutter

The first one is Online Audio Cutter from acutterpro.com. It can help you cut a song and make phone ringtone. You can use it to cut OGG, MP3, AAV, WAV, and more other audio files with a few clicks. Cutting OGG with this program you can get an OGG file with original quality.

Step 1: Visit the official website of this online service. Click “CHOOSE FILES” to upload the OGG. Also, you can drag and drop the file to its webpage;

Step 2: Move the handlebars to decide where to start and where to stop. If it is necessary, you can choose fade in or out by clicking the corresponding button;

Step 3: Click the “Cut” button to trim the OGG. After that, you can download the file from the website.

AudioTrimmer

The next one is AudioTrimmer, which enables you to cut an OGG file online. You can use it to crop certain parts out of the OGG for free. It is worth to mention that this online cutting tool supports mobile phones. In another word, you can cut OGG with it on your phone.

Step 1: Open audiotrimmer.com on a browser. Then tap on the “Choose File” button to open an OGG file. To be noted, the max file size is 100MB;

Step 2: Drag the handles to choose the part that you want to cut. Then click the “Crop” button and the tool will start to cut and output the file;

Step 3: Finally, you can download the trimmed OGG file.

For more information, please visit the source page: https://www.joyoshare.com/video-cutting/cut-ogg-file.html

How to Cut Music in iTunes (5 Steps)

Q: “Hello. Does anyone know how to trim a track in iTunes 12.4? I have a track that is in ACC format. The track is 1-hour long. I would like to break the song up into 10 tracks of 10 minutes each.” – From Apple Community

Have you ever wanted to know how you can trim or cut a song to remove the parts that you don’t really care to listen to? Well, iTunes comes in handy right at this moment. It helps you cut audio files in MP3, WAV, AAC, AIFF and Apple Lossless formats while keeping the original file intact. Detailed steps are as follows. In addition to this, we will show you another optimal method to cut songs losslessly using its alternative.

  • Method 1. Split Music on iTunes in 5 Steps
  • Method 2. Best Alternative to Split Music Effortlessly

Method 1. How to Cut Music with iTunes

If you are an iTunes user and have already equipped your computer with this software, you can direct to refer to the following quick guide to cut your music. Here’s how.

Note: Any content must be purchased through the iTunes Store and only the devices that authorized by Apple can play the purchases. Anyway, there are some inevitably problems you will meet if you are just common user. If this way is not workable for you, jump to its alternative for help, which can let you cut music freely.

Step 1: Add the Specific Music to Your iTunes Library

This first step is to import the required music to iTunes Library. Hit “Ctrl-O” in iTunes or click “File” > “Add File to Library”. Press “Open” option from the navigation window to edit the designated music.

Step 2: Mark Both Start Time and End Time Accurately

Play the music in your iTunes and check out the status pane at the top-center part. Then you are enabled to slide the controller and find out a satisfying value for both start time and end time.

Step 3: Select “start” and “stop”

Locate at the song that is being played and right click it. Find the “Get info” option and enter it. There is a “Options” section, from which you can specify desired time points.

The interface is designed as below. Put exact minutes, seconds and milliseconds into start and stop box. Once it is determined, hit “OK” to save it. Note that though iTunes will show original time length, it will only play the designated part for you.

Step 4: Save Processed Music from iTunes

To save your edited music on iTunes successfully, you can go to hit “Create New Version > Create AAC Version”. Then your music will be outputted in M4A format.

Step 5: Preview the Destination Music

To guarantee all destination music is cut according to your needs, you can right click it to choose “Show in Windows Explorer”. Then an iTunes folder will displayed in your sight. Right click the “Properties > Details” to confirm the music length again.

Method 2. How to Cut Music with Joyoshare Music Trimmer

Contributing to cutting music to small sections by removing unwanted portions, Joyoshare Media Cutter is a fairly prevalent splitting tool. It is able to shrink any music in different formats without damaging the original quality. Explicitly, there is no re-encoding process when it comes to cutting music.

Any music or audio tracks imported can be reworked in high speed, which is up to 60X exactly. You can also have access to customize your music files’ quality, codec and bit rate as long as you head to tick “Encoding mode”. In addition, Joyoshare Music Cutter is well developed with handy timeline and controller, which facilitates you to decide a trimming selection precisely. This professional tool also has options to numerous output formats, including MP3, FLAC, AIFF, WMA, AU, M4A, AAC, AC3, etc.

It is worth noting that Joyoshare Music Splitter ideal for merging several audio/video segments into a new one. In case you are in need of generating audio tracks only from a large video file, this smart tool also allows you to extract desired fragments from original source without hassle.

Key Features of Joyoshare Music Cutter:

Split music and more audio tracks in lossless quality

Support exporting music files into any common format

Complete trimming process at up to 60X faster speed

Customize quality, bit rate, codec as you like

Work to combine different audio/video into a new file

Step 1: Import Any Music File Joyoshare Media Cutter

Considering you have already downloaded and installed Joyoshare Media Cutter on your computer, you can directly launch it. Aiming at adding your music file easily, you can drag the designated music to this program or hit the “Open” button to locate it.

Step 2: Decide Cutting Selection

With the intention to enhance the accuracy of the cutting area, you should make use of the well-arranged handles and timeline. Joyoshare Media Cutter will play the required music for you automatically. Move the slider to a proper position and make it. Or you can enter an exact start time and end time to the temporal intervals. Assuming that you want to get more cropping pieces to join them together, straightly press the “+” button and tick “Merge Segments” option.

Step 3: Choose Output Format and Set Output Mode

Go forward to click the “Format” button to demonstrate all hidden parameters for you to choose. If you’d like to personalize your output music, select “Encoding mode” rather than “High-Speed mode”. Then you can hit the general audio you want, for instance, MP3, MP4, AAC, AC3, OGG, M4B, FLAC, etc. Only by hitting the gear icon at the top right corner of each format, you are permitted to enter and setup relevant parameters based on your requirements.

Step 4: Start to Cut Music with Joyoshare Media Cutter

Now click the “Start” button to initiate a splitting process. Once it completes, you will see a folder, which consists of all trimmed destination music files. Preview it one by one and delete the unsatisfying music in your way.

For more details, please visit the source page: https://www.joyoshare.com/video-cutting/cut-music-on-itunes.html

How to Trim Voice Memos on iPhone/Mac Easily

New and modern, Voice Memos enables you to use your iPhone, iPad, or Apple Watch as a portable audio recorder. With this app, you will be able to create voice record, which could be a lecture at school, an interview for a project, voice-over for a video, etc. set remarkable lines, and more with far greater ease. If you need to cut down and remove some unnecessary parts of your audio recordings sometimes, you need to learn how to trim Voice Memos. This article is about to show you how to do that on your iPhone and Mac computer respectively, explained with concise sentences in simple words.

Part 1. Trim a Voice Memo on iPhone

Part 2. Trim a Voice Memo on Mac

Part 1. How to Edit Voice Memos on iPhone – Voice Memos App

The built-in “Voice Memos” app on your iPhone is as simple as it looks. With it, you can create a voice memo, replace part of a voice memo, delete part of a ready recording, trim from the beginning to the end of a voice memo and share whichever you like to others. Here we will mainly show you how to use this app to edit voice memos directly on iPhone:

Step 1: Open “Voice Memos” app on iPhone and select a voice memo that you would like to trim;

Step 2: Tap on the chosen voice memo and click the “” to go for “Edit Recording” option;

Step 3: Now click the  icon in the upper right corner;

Step 4: Move the yellow sliders to position where you want for both beginning and end;

Step 5: Press the “Trim” button to trim the voice memo: click “Trim Original” option to replace it with the original one or click the “Save As New Recording” option to create a new voice memo rather than overwrite the original one. Next simply tap on “Done” button to finish trimming voice memo on iPhone.

Part 2. How to Edit Voice Memos on Mac – Joyoshare Media Cutter

To be honest, the way to trim voice memos on Mac is similar to it on iPhone. As a result, here we additionally introduce another solution to trim and edit voice memos on computer. That is Joyoshare Media Cutter for Mac and Windows. It can exactly cut and trim both audios and videos without quality loss. Besides, this tool also has ability to crop, merge, rotate and edit media files at 60X faster working speed.

More notably, it supports all popular audio formats and allows you to set bit rate, codec, channel and sample rate as you wish. You can also use it to add background track to your voice memo or apply sound effect to it. The one who takes it to edit videos can even embed subtitle file, customize text or image watermark, add video effect, specify resolution, etc.

Step 1: Import Voice Memo to Joyoshare Media Cutter

Get Joyoshare Media Cutter started on your Mac and click the “Open” option to add it from your local folder. You can also drag and drop it to this program.

Step 2: Confirm Trimming Points

The yellow handles adjuster and temporal interval setter help you to accurately choose a section from your required voice memo. You can move both beginning and end sliders to locate a place as you want. Or put start time and end time at your disposal. Alternatively, this program develops the other option to trim audio file as long as you click the edit icon  and utilize the scissors icon  as the following interface shows.

Note: You should use the “+” button and the “Merge Segments” option if you are going to cut your voice memo to different portions and plan to combine them together.

Step 3: Choose Output Format

Select “High-Speed” mode to fast and losslessly trim your voice memo. However, if you desire to do more audio editing operations, you are suggested to choose “Encoding” mode, which is mainly used to customize media file, like adjusting codec, bit rate and more parameters, apply audio effect, etc. Then you can go to confirm the output format, such as MP3, AAC, OGG, M4B, M4R, M4A, etc.

Step 4: Start to Trim Voice Memo on Mac

Click “OK” to confirm all settings and come back to the main interface of this program. Now you can tap on the “Start” button to begin trimming or editing the imported voice memo on your Mac computer. Afterward, head to the destination folder  to have a further check.

For more information, please visit the source page: https://www.joyoshare.com/video-cutting/trim-edit-voice-memos.html

Cut Audio Online/Offline – 4 Fast Ways Here

You may want to cut and save a certain part of one of your favorite song, remove unwanted sections of your audio recordings, get rid of some audio reactions like shouting and screaming in your music live show, etc. Then you need the help from an audio cutter. A lightweight and handy audio trimmer would make things much easier. And that’s why this article is created. It is going to show you up to 4 methods to cut audio online and offline with far greater ease. Read on and learn it quickly so that you could create a decent ring tone for yourself now.

Part 1. Trim Audio Offline Using Joyoshare Media Cutter (Lossless)

Part 2. Cut Audio File Offline via VLC

Part 3. Cut Audio Online with 2 Tools

Part 1. Trim Audio Files Losslessly – Joyoshare Media Cutter

There is no denying that compared with an online tool, an offline third-party audio cutter has more professional features. Joyoshare Media Cutter, a perfect desktop video/audio cutter and trimmer, is one of the examples, which allows cutting and splitting large files into small segments without damaging any quality at 60X lightning-quick speed. You also have the freedom to define which part you would like to cut and remove in different ways.

This software also comes with inbuilt video editor that allows cropping, rotating, inserting watermarks, applying special effects, etc. Furthermore, you are allowed to let the program merge your audio files, extract audio files from videos, etc. It supports a wide range of video and audio formats, such as AAX, RA, MP3, FLAC, OGG, AIFF, RAM, etc. as well as gadgets and devices. Therefore, you can rest assured that it will help you cut your audio files with the least effort.

Key features:

Support a full set of video and audio formats

Extract audio from video in a few simple steps

Cut videos and audios losslessly at 60X blazing-fast speed

Create more than one clip from the same source easily

Changeable parameters for audios, such as codec, bitrate, etc.

Step 1: Add Audio File to the Joyoshare Program

After downloading and installing Joyoshare Media Cutter, you are able to double click to launch it on your computer. Drag your desired audio file to the program directly. It supports several files at a time. You are also free to press the “Open” button to import your audio from your local folder.

Step 2: Define the Segment to Cut

There are two available ways for you to cut your audio file precisely and perfectly. One way is that you can take advantage of the yellow slider to select which part you would like to trim. The other is that you can use the millisecond-precise temporal interval to set the start/end time manually.

Note: If you intend to create more audio clips from the same source, you can hit on the “+” icon below the “Open” button to copy more editing tracks.

Step 3: Choose the Output Format

The “Format” button can be easily seen on the right side of the screen. Here you can choose either the high-speed mode or the encoding mode. The high-speed mode will enable you to cut your audio file losslessly, and the encoding mode is able to help you save any changes you make on your file. Next, head to the “General Audio” tab and select the output format you want.

Step 4: Start to Cut Audio File

When everything is set, you are permitted to press the “Start” button to cut your audio file. Wauty for a while till the progress bar is completed. Then you will be able to check the file by pressing the “Open the Output Folder” button at the bottom of the screen.

Part 2. How to Cut Audio Clips with VLC

Step 1: Launch VLC on your PC/Mac/Linux;

Step 2: Navigate to View > Advanced Controls to enable the “Record” button, which will appear between the time slider and the “Play” button;

Step 3: Now you can begin to play your audio file and drag the slider to the position where you would like to begin to cut your audio file;

Step 4: Next, click the “Record” button to start recording, and then stop recording to save the file.

Part 3. Trim Audio Online in 2 Ways

Audio Trimmer

Audio Trimmer serves as an online freeware which allows users to trim audio files in no time flat. You can use it do many things like cutting MP3 songs to create beautiful ring tones without any downloading and installation. It works with a huge array of audio formats, including MP3, WAV, APE, FLAC, M4R, M4A, AAC, and more. In addition to this, “fade in” and “fade out” effects are available during cutting. Notice that the max file size will be 100MB.

Step 1: Open the website and click the “Choose File” to upload your audio;

Step 2: Drag the green handles or enter the start/end time manually to decide where you would like to begin to cut your audio file and where you would like to stop;

Step 3: Press the blue “Crop” button to start cutting your audio online for free.

Audio Cutter Online by Clideo

Another online audio cutter we would like to recommend in this part is the Audio Cutter Online y Clideo. It has an intuitive design, which allows you to cut and trim audio files in a few simple clicks. Using this tool, you are capable of cutting your audio in 2 ways. Besides, you are allowed to decide whether you are going to extract or delete the selected part. Similarly, it works with most popular audio formats, such as MP3, AAC, FLAC, M4A, AC3, etc.

Step 1: Open the site: https://clideo.com/cut-audio;

Step 2: Import your audio file from computer, Google Drive, or Dropbox;

Step 3: Drag the green edge of the frame or enter the start/end time on the right side of the window to define where you would like to save or remove;

Step 4: Press the “Cut” button to start to trim audio files online.

Trim M4A Files? 3 Solutions to Share Here

You may have some big M4A files which you would like to trim to cut down its file size so that they could be played on your portable devices more easily. Or you have downloaded some M4A music from the internet and you intend to get rid of the commercial parts. You may also want to trim M4A files into different pieces for various use. To trim your M4A files instantly and perfectly, you may need a professional as well as handy audio cutter. Then you are in the right place. This article is going to guide you how to cut your M4A files with the help of three popular audio cutter software.

Part 1. Joyoshare Audio Cutter

Part 2. Boilsoft Video Splitter

Part 3. Aconvert

Part 1. How to Trim M4A Files – Joyoshare Audio Cutter

Joyoshare Audio Cutter is regarded as one of the most competitive tools to split M4A files on PC and Mac. It provides all-round solutions to carry out cutting process. Not just confined to M4A, this full-featured multimedia cutter also supports other audios, like FLAC, AIFF, WMA, AU, MP3, M4A, AAC, AC3, etc. You’re empowered to customize quality, codec, size and more.

Best of all, it can keep lossless quality for you and is capable of conducting any task at up to 60X faster speed. With its precise timeline, you can firmly control every time point.

Key Features of Joyoshare Audio Cutter:

Split M4A files in 100% original quality

Cut kinds of audios at up to 60X amazing speed

Extract audio from video in a pretty handy way

Specify channel, codec, sample rate and bit rate

With built-in media player and video editor

Step 1: Open an M4A File to Joyoshare Program

Equip your computer with this Joyoshare M4A splitter and directly launch it by double clicking the icon on your desktop. Now add your required M4A audio file to this program. You can click the “Open” button to search it from the local folder or straightly drag and drop it to a specific area.

Note: You can only add one M4A file to Joyoshare Audio Cutter each time. In other words, it is not supportable to process M4A audios in batch.

open m4a in joyoshare audio cutter

Step 2: Designate Mode and Format to Cut

Continue to press the “Format” panel. Depending on your preference, you are allowed to switch distinct mode, including “High-speed mode” and “Encoding mode”.

The former can accomplish cutting with fast and lossless performance while the latter enables you to customize quality, codec, size, etc. Also, there are a wide variety of output formats you can pick up, such as MP3, M4A, AAC, AC3, OGG, AIFF, WAV, WMA, M4B, MKA, etc.

select output format

Step 3: Start to Split M4A Audio

To make the selected cutting range as precise as possible, this program is well designed with thoughtful timeline and slider. You can simply move the beginning and end handles to locate an exact point. Don’t worry. This smart tool can automatically play your M4A audio so that you can grasp every second clearly. Moreover, you can also enter specific start time and end time to set a temporal interval in your way.

Note: This program can do well in merging different fragments into a new one. What you need to do is to hit the “+” button to generate more than one segments from the same source and tick the “Merge Segments” option to get them combined.

split m4a audio

Step 4: Save and Output Splitted M4A File

Next, you can set out to hit the “Start” button to save your new M4A audio. From the pop-up local folder, you will see all destination audio files. Play them one by one to check whether it is qualified. If not, delete the imperfect one as you like. Of course, you can repeat above operation to produce more manageable files.

Part 2. How to Split M4A Files – Boilsoft Video Splitter

Boilsoft Video Splitter is such an user-friendly tool to split both large videos and audios into smaller segments without re-encode. Aside from the flexible trimming, it’s also able to split your M4A and other files into multiple sections of equal size. It’s even available to convert format as you like, such as AVI, WMV, iPod, DVD, VOB, MP3, etc.

boilsoft video splitter

Pros:

Cut and trim M4A without re-encode

Support many audio and video formats

With direct splitting mode to keep original quality

Cons:

Don’t support batch processing

Guide:

Step 1: Start the installed Boilsoft Video Splitter;

Step 2: Press the Open button to choose ‘M4A – MPEG-4 Audio(*.m4a)’ under “File of type” menu and finish adding M4A file;

Step 3: Select “Split into equal-size clips” or “Split by Selection”;

Step 4: Confirm Start Time and End Time and click on “Split Now” to complete splitting M4A audio.

Part 3. How to Cut M4A Files – Aconvert

Aconvert is a popular online media processor in the current market. It helps cut audio online in a remarkably simple manner. By using it, you’re enabled to deal with different files, such as WAV, MP3, AAC, WMA, OGG, AU, FLAC, RA, M4A, etc. Importantly, it’s suitable for novices who have no tech skills. You can access it without installation.

aconvert cutter

Pros:

Cut M4A online freeEasy for anyone to use

Allow uploading files from URL, Dropbox and Google Drive

Cons:

The supported audio file size is limited to 200M

Guide:

Step 1: Go to Aconvert Audio Split and click “Choose File” to upload an M4A file;

Step 2: Set “Start position” and “Duration” to get desired M4A section;

Step 3: Simply tap on “Submit” to initiate cutting M4A and check it in “Output Results”.

For more details, please visit the source article: https://www.joyoshare.com/video-cutting/split-m4a-files-with-ease.html